
I recently needed a way to be able to apply configuration management against a farm of highly restrictive on-premise Windows Server while utalising only the software and pre-existing infrastructure & firewall policies.
I have
* 95% vanilla Windows 2012 Servers (R2 and higher)
* Azure DevOps agents
* A fully domain joined environment
I do not have
* Internet access (apart from our Azure DevOps Agent )
* Any ports open on this server apart from https-443 inbound
* WinRM (Windows Remote Management) is running, but all ports for incoming/outgoing comms are closed to all hosts apart from a specific list designated to the infrustructure/security teams networks .
Note: This is important and will be covered later
Thankfully, Microsoft provides Windows Powershell Desired State Configuration (DSC) as part of the built in software services.
With this, I am able to utalise an imperative based configuration management system without having to implement solutions such as Chef or Puppet.
Before we can begin explaining how we can use Azure DevOps to run Powershell DSC, it is important to understand what it is and the two ways that a DSC configuration can be applied.
What is Powershell DSC
Powershell Desired State Configuration is a Microsoft toolset similar to Chef, Puppet, Ansible or Saltstack that allows system administrators to write imperative based configurations that describe their desired system end state. Powershell Desired State Configuration is automatically available as part of windows and the Microsoft Azure Cloud platform stack for no extra cost.
More information: https://docs.microsoft.com/en-us/powershell/scripting/dsc/getting-started/wingettingstarted?view=powershell-7
Pull Mode
A "Primary" server is setup that all "Secondary/Node" servers connect. During each run phase, the Life-Cycle Configuration Manager (LCM) will reach out to "Primary", pull down its configurations and apply them.
To set this up, you need a server that can act as a primary, in addition you will need to reconfigure all nodes and firewall policies to allow communications via WinRM.
Push ModeA user process is setup to Push configurations to a target node, once the node has the new configurations the Start-DSCConfiguration commandlet is invoked and the LCM begins its apply. Once again, WinRM is used for the execution.
For this example, we will be creating a basic Powershell DSC configuration that creates a file on a target node if it does not exist. Although basic, utalising this method will allow us to extend and create far more powerful configurations.
When are are done, we will have a fully automated build and release pipeline.
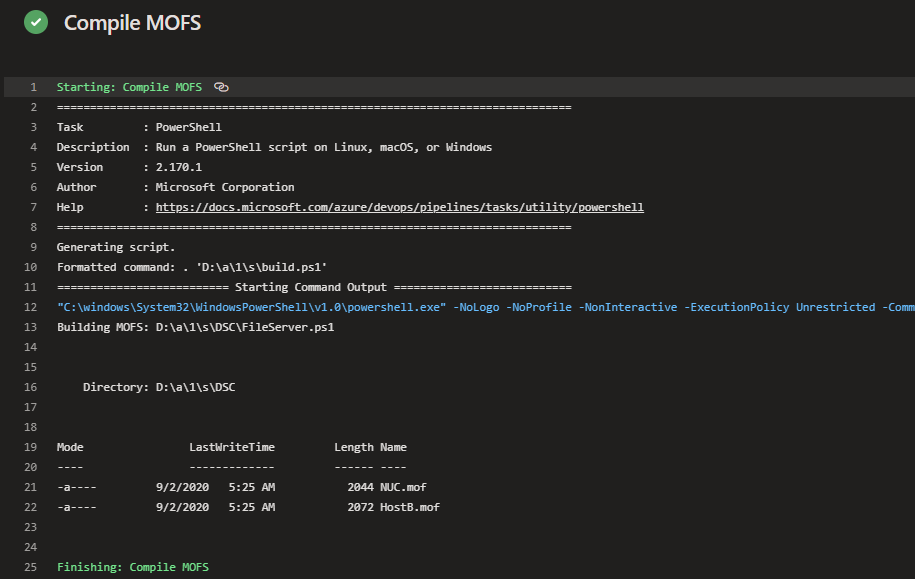
The first thing we need to do is create a build.ps1 file. This file will be responsible for compiling all of our Powershell DSC resources into associated Powershell DSC Managed Object Format (MOF) files. We will be using this file within the Azure DevOps build pipelines to automatically create our MOF files, it is also used within our standard development workflow so we do have some mof and mof.error cleanout logic.
More info on MOFS: https://docs.microsoft.com/en-us/windows/win32/wmisdk/managed-object-format--mof
#Set global error action
$ErrorActionPreference = 'Stop'

#Delete Pre-existing MOFS in our DSC base folder
Get-ChildItem "$PSScriptRoot\DSC" -Recurse -Include '*.mof' | Remove-Item -Force
Get-ChildItem "$PSScriptRoot\DSC" -Recurse -Include '*.mof.error' | Remove-Item -Force

#Build MOFS
$DSCFiles = Get-ChildItem "$PSScriptRoot\DSC" -Recurse -Include '*.ps1'

foreach ($eachConfiguration in $DSCFiles) {
    Write-Output "Building MOFS: $eachConfiguration"
    .$eachConfiguration
}
We will now create our configuration file, for this example, we will be creating a folder if it does not exist on our target server.
This file is responsible for ensuring that defined directories have been created for all nodes that have a Role of 'FileServer'
Configuration FileServer{
    Import-DscResource -ModuleName 'PSDesiredStateConfiguration'

    #Find all notes where the Role Equals FileServer
    node $AllNodes.Where({$_.Role -eq 'FileServer'}).NodeName {

        #Create our directory
        File DirectoryCopy
        {
            Ensure = "Present"
            Type = "Directory"
            DestinationPath = $Node.DirectoryPath #Grab the directory path for the current Node
        }
    }
}
#Define Generate our MOF file
FileServer -OutputPath "$PSScriptRoot" -ConfigurationData "$PSScriptRoot\configdata.psd1"
We will also create a configuration data file for our hosts.
The below example defines two hosts:
Host A
This host has a machine name of 'NUC', a role of 'FileServer' and we want to ensure a directory exists at 'D:\path\patha\'
Host B
This host has a machine name of 'WIN-6657', a role of 'FileServer' and we want to ensure a directory exists at 'c:\path\someotherlocation\'
@{
    AllNodes = @(
            @{
                #Define HostA
                NodeName = 'NUC'
                DirectoryPath = 'D:\path\patha\'
                Role = 'FileServer'
            },
            @{
                #Define HostB
                NodeName = 'WIN-6657'
                DirectoryPath = 'C:\path\someotherlocation\'
                Role = 'FileServer'
             }
        )
}
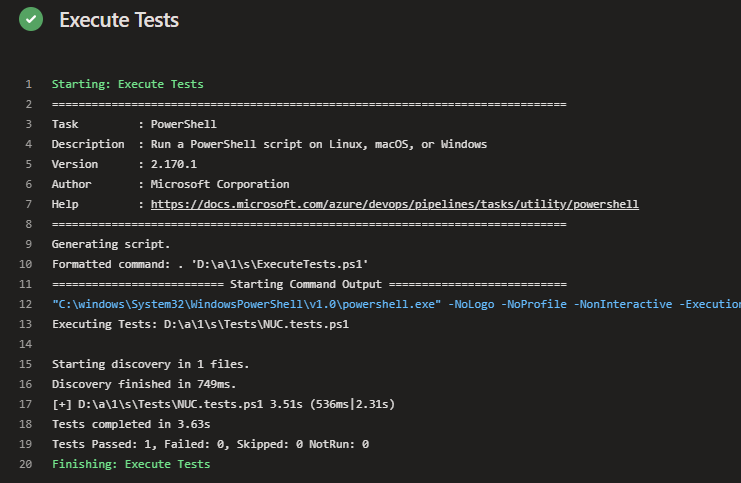
Now that we have our Configurations, we need to define our Unit tests.
For this basic example, we will ensure that our directories have been created.
To do this, we will create a <hostname>.tests.ps1 file which will house the tests we want to manage for our particular hosts. For generic tests that would be against all hosts, we would create a seperate file or file(s) depending on the amount of tests we want to execute.
#nuc.tests.ps1
Describe "Create directories" {

    It "Created our directory" {
        "D:\path\patha\" | Should -Exist
    }
}

#WIN-6657.tests.ps1
Describe "Create directories" {

    It "Created our directory" {
        "C:\path\someotherlocation\" | Should -Exist
    }
}
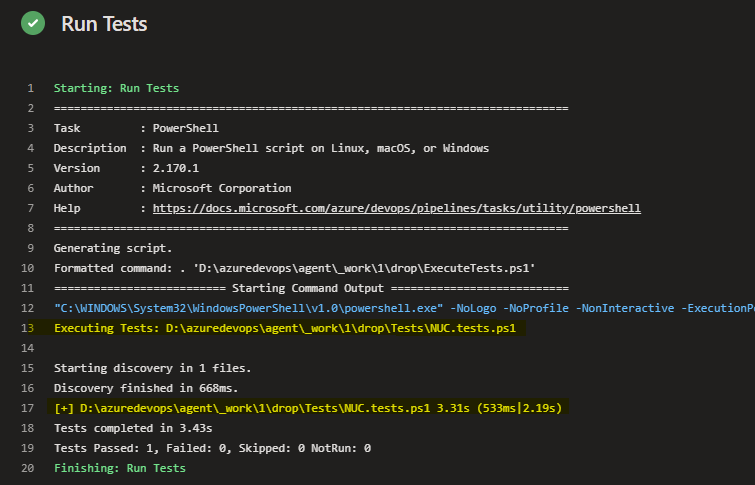
This file is responsible for executing tests against the machine for the current host.
Note that we are using the $env:COMPUTERNAME variable.
#Run our tests
$ScriptName = "$PSScriptRoot\Tests\$env:COMPUTERNAME.tests.ps1"
if(Test-Path -Path $ScriptName){
    Write-Output "Executing Tests: $ScriptName"
    .$ScriptName
}
else {
    Write-Output "No tests were found for this host: $ScriptName"
}
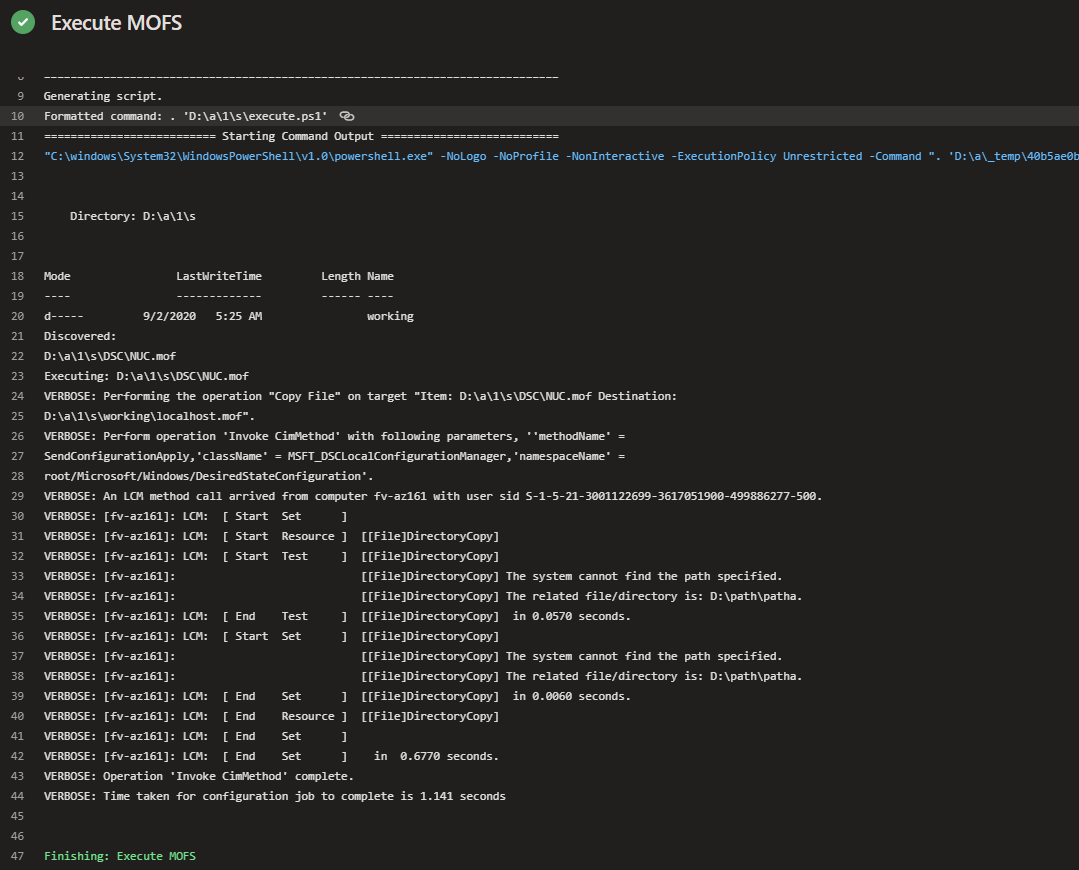
To be able to run our configurations, we need to define a execution script.
This script will search all folders under the "$PSScriptRoot\DSC" directory for any MOF files that match the name the machine we are currently executing against. Once it finds a matching file, it will invoke the DSC configuration service which will start the execution against the directory containing the file:
Start-DscConfiguration -Path $WorkingDirectory -Wait -Verbose -Force -ComputerName 'localhost'
But wait, we have a problem.
When we run the DSC configuration against our host machine, we are presented with the following error.
The WinRM client sent a request to an HTTP server and got a response saying the requested HTTP URL was not available.
A quick google search on this error reveals a few different points.
a) If You have IIS running on the box and the default website is active without a host header, then you should add a host header.
b) If PSRemoting was enabled on this machine via group policy, and the IPv4 filer value is not *, then you should change the GPO policy to allow for *.
Given the above two points in my case are true, and the fact we cannot change any settings on the machines, at this point we have two options.
Option A
Powershell DSC has a known concept of 'localhost' as the node name.
We could therefore change the name of the node to 'localhost', but the problem with this approach is that we cannot seperate our machines and their configurations, we will only ever be able to have one node. This will cause Powershell DSC to compile all configurations into a single localhost.mof meaning all nodes will get all configurations.
Option B
Rename our <machine-name>.mof to 'localhost.mof' prior to execution.
When the Powershell DSC provider sees the name localhost.mof, it does not attempt to reach out to a remote machine, instead it will execute the configurations against the local machine. Given this, we will use this approach.
Warning
Given we are dynamically finding and renaming scripts to 'localhost.mof' you need to be EXTREMELY careful to ensure that the script you are renaming for execution matches the name of the target host.
Powershell DSC does not have any built in validation checks to ensure the host is valid for execution apart from the filename (which we are changing).
#Set global error action
$ErrorActionPreference = 'Stop'
#Global Initialisation Variables
$WorkingDirectory = "$PSScriptRoot\working"
$ExecutionFile = (Join-Path $WorkingDirectory -ChildPath "localhost.mof")
#Clean current working directory
if(Test-Path($WorkingDirectory)){
Remove-Item $WorkingDirectory -Recurse -Force
}
New-Item -Path $WorkingDirectory -ItemType Directory -Force
#Get All MOFS for this machine
$RoleMOFFiles = Get-ChildItem "$PSScriptRoot\DSC" -Recurse -Include "$env:COMPUTERNAME.mof"
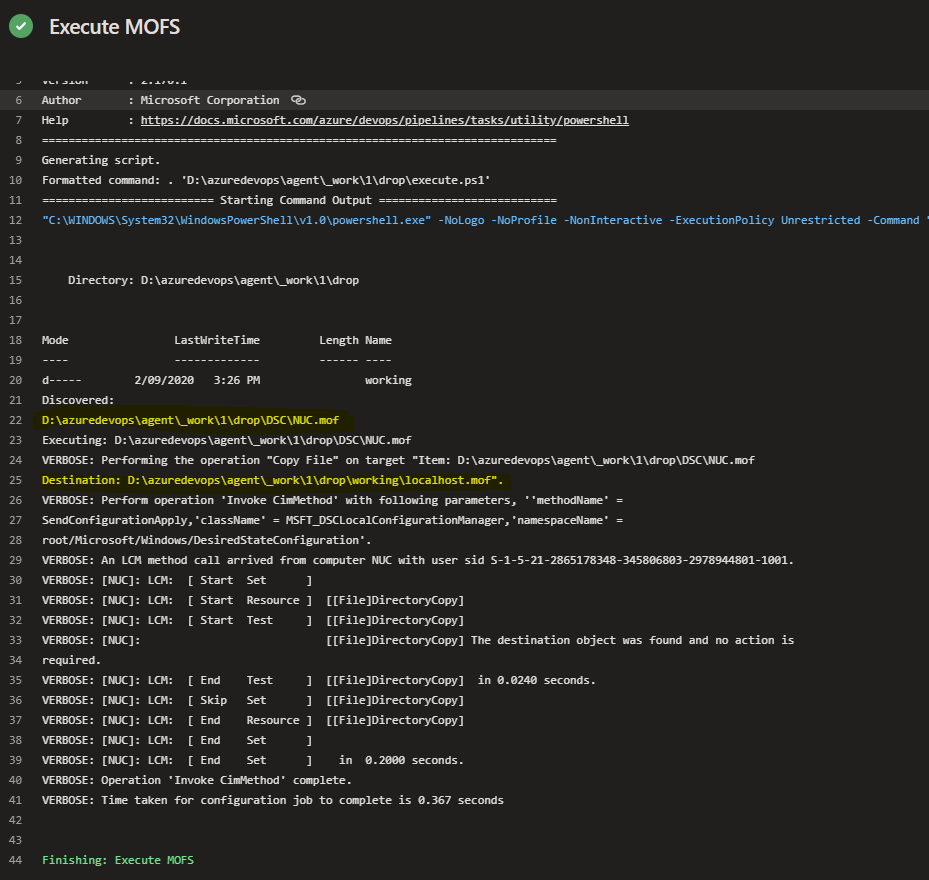
#Print out the files that were found for this machine
Write-Output "Discovered:"
$RoleMOFFiles.FullName
foreach ($eachConfiguration in $RoleMOFFiles) {
#Regenerate for execution
Write-Output "Executing: $eachConfiguration"
Copy-Item $eachConfiguration.FullName -Destination $ExecutionFile -Force -Verbose
Start-DscConfiguration -Path $WorkingDirectory -Wait -Verbose -Force -ComputerName 'localhost'
}
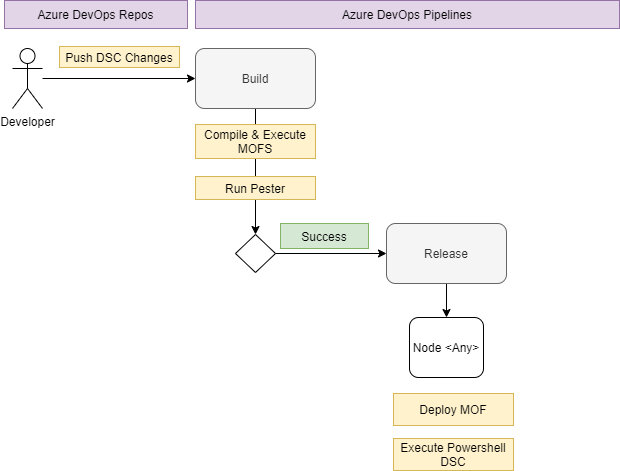
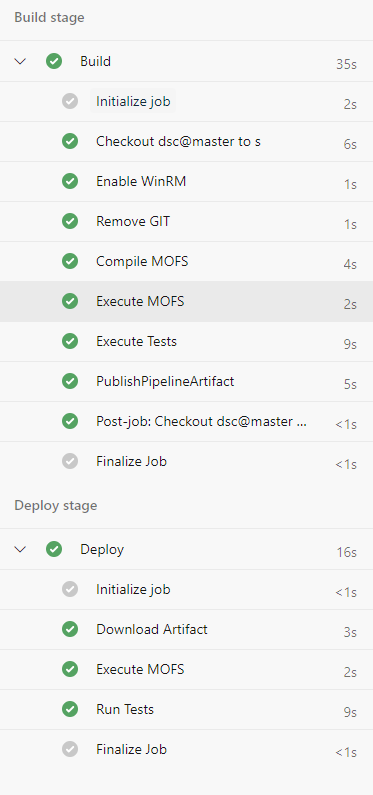
Now that we have all of our building blocks sorted. We need to build out our Azure DevOps build and release pipeline lines.
These pipelines need to:
a) Compile our MOFS
b) Execute our MOFS against the Azure DevOps machine
c) Run our tests
d) Publish everything an artifact so that we can release it against our server farm.
The below Azure DevOps pipeline script will create everything we need for build & deploy.
Build Phase
First it will enable the winrm service on Azure DevOps, it will then compile, execute, run our tests and finally publish our code.
Deploy Phase
This phase will execute & run our tests against our target nodes.
trigger:
- master

stages:
- stage: Build
  displayName: Build stage

  jobs:
  - job: Build
    displayName: Build
    pool:
      vmImage: 'windows-2019'

    steps:
    - powershell: 'winrm quickconfig -quiet'
      displayName: 'Enable WinRM'

    - powershell: "Remove-Item '.git' -recurse -force"
      displayName: 'Remove GIT'

    - task: PowerShell@2
      displayName: 'Compile MOFS'
      inputs:
        targetType: filePath
        filePath: ./build.ps1

    - task: PowerShell@2
      displayName: 'Execute MOFS'
      inputs:
        targetType: filePath
        filePath: ./execute.ps1
      env:
        COMPUTERNAME: NUC

    - task: PowerShell@2
      displayName: 'Execute Tests'
      inputs:
        targetType: filePath
        filePath: ./ExecuteTests.ps1
      env:
        COMPUTERNAME: NUC

    - publish: $(System.DefaultWorkingDirectory)
      artifact: drop

- stage: Deploy
  displayName: Deploy stage
  dependsOn: Build
  condition: succeeded()

  jobs:
  - deployment: Deploy
    displayName: Deploy
    environment:
      name: "production"
    pool:
      name: "production"

    strategy:
      runOnce:
        deploy:
          steps:
          - task: PowerShell@2
            displayName: 'Execute MOFS'
            inputs:
              targetType: filePath
              filePath: "$(Pipeline.Workspace)/drop/execute.ps1"

          - task: PowerShell@2
            displayName: 'Run Tests'
            inputs:
              targetType: filePath
              filePath: "$(Pipeline.Workspace)/drop/ExecuteTests.ps1"
How about deployment pools?
This examply defines a single on-premise machine called 'NUC' in the deploy phase. Because of the way we have defined our scripts, we could easily change this to instead target a pre-defined deployment pool of agents, this way we can update our entire fleet in one hit, with one task given our execution script is smart enough to only run the MOFS applicable to the host it is being executed on.

Excellent, if you dont have the restrictions that I faced during my development you can use everything you have seen here with a minor adjustment to the Execute.ps1 script.
Instead of renaming the file to 'localhost.mof', it will instead retain the computer name and continue forward as normal.
#Set global error action
$ErrorActionPreference = 'Stop'

#Global Initialisation Variables
$WorkingDirectory = "$PSScriptRoot\working"
$ExecutionFile = (Join-Path $WorkingDirectory -ChildPath "$env:COMPUTERNAME.mof")

#Clean current working directory
if(Test-Path($WorkingDirectory)){
    Remove-Item $WorkingDirectory -Recurse -Force
}
New-Item -Path $WorkingDirectory -ItemType Directory -Force

#Get All MOFS for this machine
$RoleMOFFiles = Get-ChildItem "$PSScriptRoot\DSC" -Recurse -Include "$env:COMPUTERNAME.mof"

#Print out the files that were found for this machine
Write-Output "Discovered:"
$RoleMOFFiles.FullName

foreach ($eachConfiguration in $RoleMOFFiles) {
    #Regenerate for execution
    Write-Output "Executing: $eachConfiguration"
    Copy-Item $eachConfiguration.FullName -Destination $ExecutionFile -Force -Verbose
    Start-DscConfiguration -Path $WorkingDirectory -Wait -Verbose -Force -ComputerName "$env:COMPUTERNAME"
}
You can download everything from this article here.